Getting started
Introduction
This quick start guide presents how to use ConfErr by giving a step-by-step procedure that guides the reader in the process of testing the effect of typos in configuration files of the rsync daemon. Rsync is a software that can be used to transfer files to/from remote systems. This application usually comes preinstalled in common Linux distributions. For more information on rsync please refer to its website.
Setup Rsync
Before being able to test configuration errors it is necessary to create a working configuration of the system, scripts to start and stop the daemon and some test scripts to verify its functionality. The initial rsync configuration that is created in this procedure shares two folder “ro” and “rw”, the first is world accessible and is in read only, the second is both readable and writable but only by a user “user1”. The following steps configure such system:
-
Create a directory that will store all the files for the test:
> mkdir testkit-rsync && cd testkit-rsync
-
Create a directory with the files necessary to run rsync:
> mkdir default-install && cd default-install
-
Create the two directory to share and some content:
> mkdir ro rw
> touch ro/public.txt rw/secret.txt
-
Create the configuration file for rsync rsyncd.conf with the following content:
# use an unprivileged port
port = 8873
# log file (useful for debugging)
log file = rsyncd.log
# pid file (useful to stop the daemon)
pid file = rsyncd.pid
# do not try to chroot (requires root privileges)
use chroot = false

# ==========
# first share, read/write access to user1
# ==========
[rwshare]

# path to the directory published
path = rw
# this share can be written
read only = false
# users that can access this share
auth users = user1
# file containing the passwords
secrets file = rsyncd.secrets
# secrets file can be world readable
strict modes = false

# ==========
# second share, read only access to everybody
# ==========
[roshare]

# path to the published directory
path = ro
#read only access
read only = true -
Create the file rsyncd.secrets that stores the passwords:
user1:password
-
Prepare a script to start rsync called startup.sh with the following content:
#!/bin/bash

# change to the correct directory
cd `dirname $0`

# kill rsync if already running
if [[ -f rsyncd.pid ]] ; then
   kill `cat rsyncd.pid`
fi

# start rsync
rsync --daemon --config rsyncd.conf -
Prepare a script to stop rsync called shutdown.sh with the following content:
#!/bin/bash

# change to the correct directory
cd `dirname $0`

# kill rsync if running
if [[ -f rsyncd.pid ]] ; then
   kill `cat rsyncd.pid`
fi -
Prepare a script called test-read.sh in a new directory tests to test reading a file from the server with the following content:
#!/bin/bash

# change to the correct directory
cd `dirname $0`

# create a temporary directory
TEMPDIR=`mktemp -d test.XXXX`

# try to download from the read only share
rsync -avz rsync://localhost:8873/roshare/   $TEMPDIR

# save exit value of rsync
RESULT=$?

rm -r $TEMPDIR

# return the exit code of rsync, this will be used by ConfErr to
# detect the outcome of the test
exit $RESULT -
Prepare a script called test-write.sh in the same directory tests to test writing a file from the server with the following content:
#!/bin/bash

# change to the correct directory
cd `dirname $0`

# create a temporary directory
TEMPDIR=`mktemp -d test.XXXX`

# create a file in the temporary directory
echo “test” > $TEMPDIR/testfile

# try to download from the read only share
export RSYNC_PASSWORD=password
rsync -avz $TEMPDIR rsync://user1@localhost:8873/rwshare/

# save exit value of rsync
RESULT=$?

rm -r $TEMPDIR

# return the exit code of rsync, this will be used by ConfErr to
# detect the outcome of the test
exit $RESULT -
Set the execution bit on all the scripts created:
> chmod +x startup.sh shutdown.sh tests/*
-
Rsync can now be started with the following command:
> ./startup.sh
-
To test that the daemon is running correctly you can execute the following commands:
> rsync rsync://user1@localhost:8873/rwshare/
Password:  password
drwxrwxr-x
4096 2008/09/27 12:04:06 .
-rw-rw-r--
0 2008/09/27 12:04:06 secret .txt

> rsync rsync://localhost:8873/roshare/
drwxrwxr-x
4096 2008/09/27 12:04:11 .
-rw-rw-r--
0 2008/09/27 12:04:11 public
-
Now it is possible to test the two scripts:
> ./tests/test-read.sh && echo Success
building file list ... done
test.8867/
test.8867/testfile
sent 163 bytes  received 44 bytes  414.00 bytes/sec
total size is 11  speedup is 0.05
Success


> ./tests/test-read.sh && echo Success
building file list ... done
test.8867/
test.8867/testfile
sent 163 bytes  received 44 bytes  414.00 bytes/sec
total size is 11  speedup is 0.05
Success
-
After verifying that rsync is correctly working it is possible to shut it down:
> ./shutdown.sh
-
It is now possible to change the configuration file name, the rsyncd.conf configuration file will be generated by ConfErr:
>mv rsyncd.conf rsyncd.conf.template
Prepare the test plan
-
Setup the main test plan properties:
- Set the name of the fault plan to Rsync Test, this name is used to generate the report of the fault injection
- Set the root directory to the directory where all the scripts created to start, stop and test rsync. This directory will be used to compute all relative paths inserted in the test plan.
-
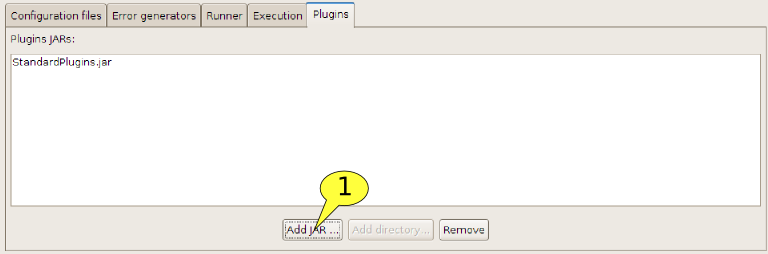
Load the standard plugins:
- Click on Add JAR... and select the file StandardPlugins.jar downloaded from the ConfErr website.
-
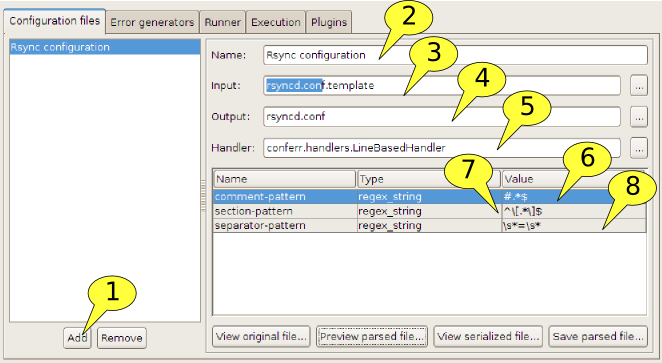
Setup the configuration file that where the errors will be injected:
- Click on Add to add a new configuration file
- Set the name of the configuration file to Rsync configuration
- Set the input to rsyncd.conf.template, this is the file that will be parsed
- Set the output to rsyncd.conf, in this file the configuration with the errors will be written
- Set the handler to conferr.handlers.LineBasedHandler this handler can parse and serialize rsync configurations. It divides the configuration file in sections, parse directives formed by a name, a separator and a value. This handler can also skip comments.
- Configure the regular expression that the handler uses to recognize the comments to #.*$
- Configure the regular expression used by the handler to recognize the section headers to ^\[.*\]$
- Configure the regular expression that recognizes the separator between directive names and values to \s*=\s*
-
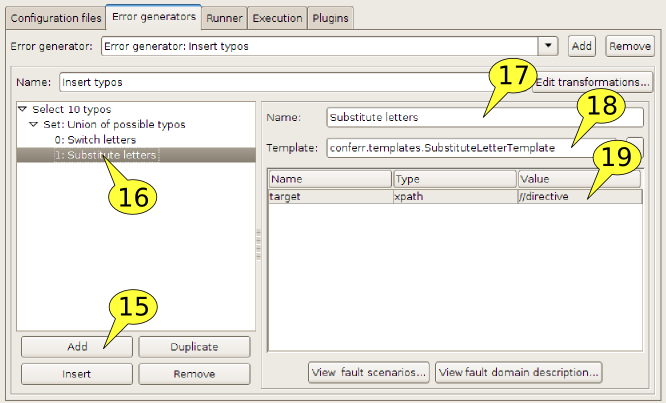
Create a new error generator:
Figure 5 Setting an Union template
- Click on Add to create a new error generator
- Set the name of the error generator to Insert typos, this name will be used later to reference the error generator
- Click on the first element of the tree that represent the error generator, each element in this tree is a fault template. Fault templates that compose or filter other fault templates are represented as parents.
- Set then Name parameter of the selected fault template to Select 10 typos. This template will filter the children template such that only 10 faults are generated.
- Set the Template parameter to conferr.templates.RandomSubSetTemplate, this plug-in implements the filtering function.
- Set the plug-in parameter size to 10, to test more faults it is possible to increase this parameter
- Click on the template that is child of the Select 10 typos template
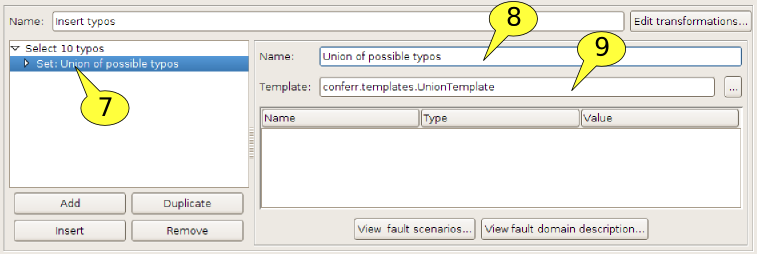
- Insert in the Name field Union of possible typos
- Set the Template parameter to conferr.templates.UnionTemplate. This fault template generates a set of faults that is the union of all faults generated by its children fault templates.
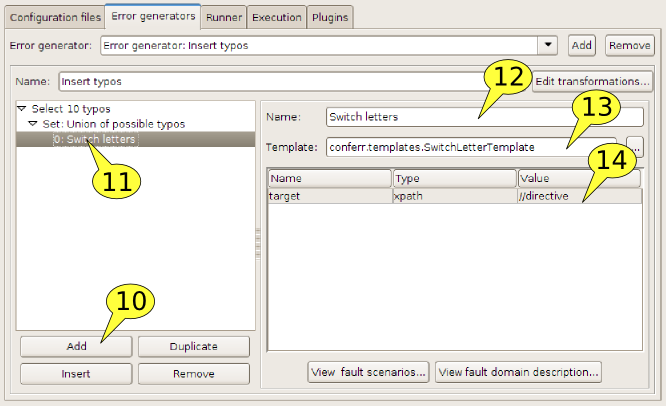
- Click on the Add button to add a new fault template as a child of the Union of possible typos template
- Click on the newly created template
- Set the Name parameter to Switch letters
- Set the Template parameter to conferr.templates.SwitchLetterTemplate. This template insert typos where two letter are swapped.
- Set the target parameter to //directive. This parameter indicates to the template which parts of the configuration are candidates for the injection of errors. In this case the XPath expression selects the value of the directives.
- Click again on the Union of possible typos template and then on the Add button to add a new fault template as a child.
- Click on the newly created template
- Set the Name parameter to Switch letters
- Set the Template parameter to conferr.templates.SubstituteLetterTemplate. This template insert typos where a letter is substitued with a letter that is near on the keyboard.
- Set the target parameter to //directive. This parameter indicates to the template which parts of the configuration are candidates for the injection of errors. In this case the XPath expression selects the value of the directives.
-
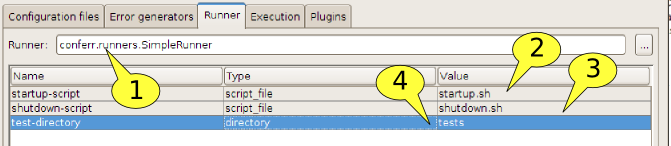
Setup the plugin that runs the tests:
- Set the runner parameter to conferr.runners.SimpleRunner, this runner plug-in starts and stop the system with by running executables (script) and tests the effect of the error injection by running all the executable (scripts) found in a directory.
- Set the startup-script parameter to startup.sh, the startup script prepared in the previous section.
- Set the shutdown-script parameter to shutdown.sh, the shutdown script prepared in the previous section.
- Set the test-directory parameter to tests, the directory that contains the test scripts prepared in the previous section.


Running the test plan
In the previous two sections all the required scripts have been created and ConfErr has been configured. Now it is possible to run the fault injection.
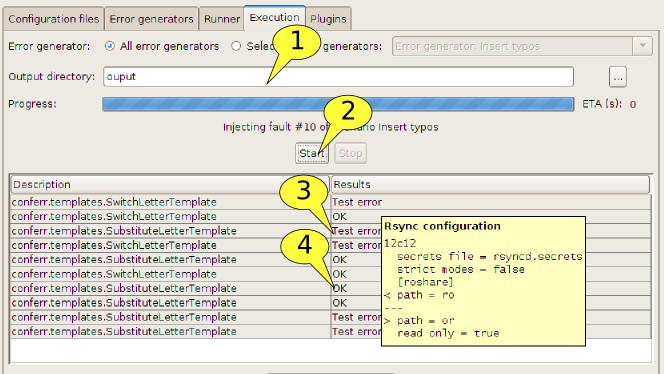
- Set the Output directory parameter to an existing, empty directory. This directory will contain a directory for each fault. When the scripts are executed by the runner they receive the path of this directory in the OUTPUTDIR environment variable. The scripts can output some information run-specific data in this directory (for instance a log of the run of the daemon).
- Click on Start
- While the test injection is running the partial results start appearing by putting the mouse on a line it is possible to see a diff between the template configuration file and the configuration file used for that fault injection.
- By double clicking on a result it is possible to have additional information on the output of the different test scripts.
- By clicking on the button Save resilience profile it is possible to export the results of the fault injection to an XML file for further processing.